You spent hours baking, prepping, and labeling your products. The last thing you want is a customer opening a crushed box of cookies or a jar of jam rattling around loose in a bag. Good food packaging for local delivery is the difference between a customer who orders once and a customer who orders every week.
The short version: Package baked goods in rigid kraft boxes with tissue lining, wrap jars with bubble wrap or cardboard dividers, and use insulated bags for anything temperature-sensitive. Keep costs low with bulk kraft boxes ($0.50 to $1.50 each), simple branded stickers, and a handwritten label. Load your car with heavy items on the bottom and fragile items on top, deliver within two hours of packing, and always include your cottage food label on every package.
Your packaging is your brand when you are not standing behind a farmers market table. It is the first thing a customer sees, touches, and judges before they ever taste your food.
When you deliver in person at a market or a pickup, you can hand someone their order with a smile and say "careful, the frosting is still soft." With delivery, the package has to do all of that work for you.
Here is what happens when packaging falls short:
The average cottage food vendor loses 5 to 10 percent of delivery revenue to damaged products, refunds, or customers who simply do not reorder. Most of that is preventable with better packaging.
If you are just getting started with delivery, read this guide on how to offer local food delivery as a one-person operation before diving into packaging details.
The right packaging depends entirely on what you are delivering. A loaf of banana bread needs a different setup than a dozen decorated sugar cookies or a jar of pickled peppers.
Here is a breakdown of what works for the most common cottage food products:
| Food Type | Recommended Packaging | Approx. Cost Per Unit |
|---|---|---|
| Cookies, brownies, bars | Kraft bakery box with tissue lining | $0.60 - $1.00 |
| Bread, rolls, buns | Kraft paper bag or poly bag with twist tie | $0.10 - $0.30 |
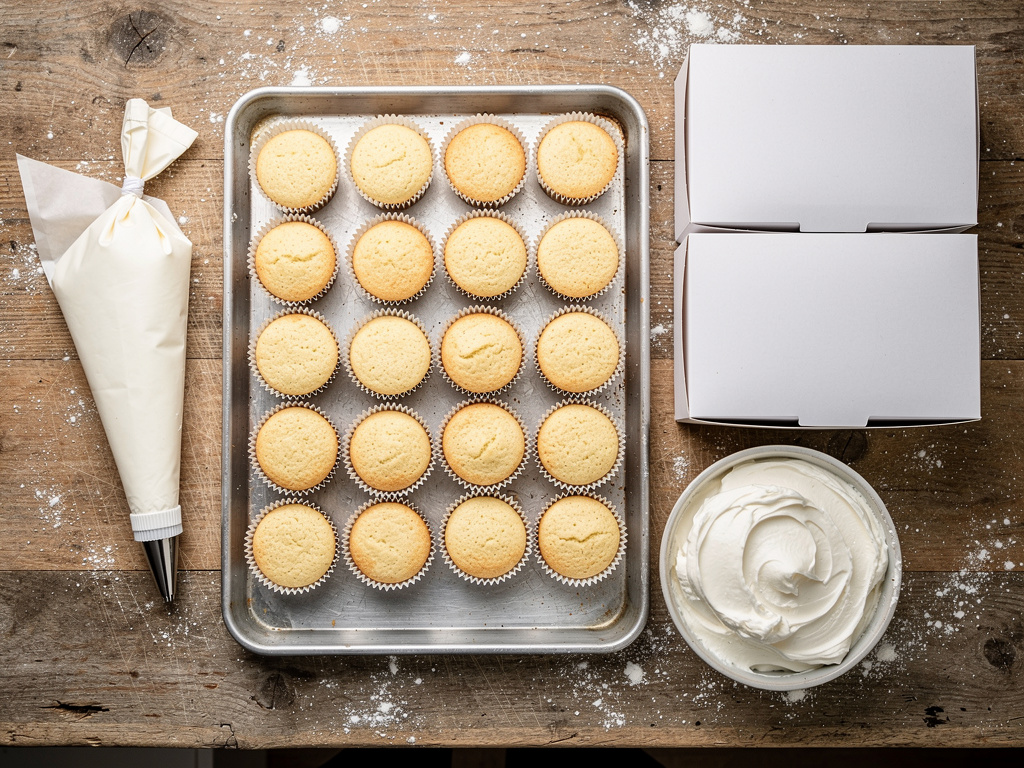
| Cupcakes, decorated cakes | Rigid box with cupcake insert or cake board | $1.50 - $3.00 |
| Jams, sauces, preserves | Bubble wrap sleeve + cardboard divider in box | $0.75 - $1.50 |
| Pies, tarts | Pie box with window (holds shape, prevents sliding) | $1.00 - $2.00 |
| Hot or warm items | Foil wrap + insulated bag | $0.50 - $1.00 (foil) + bag (reusable) |
| Granola, snack mixes | Resealable stand-up pouches | $0.25 - $0.50 |
| Fresh produce | Breathable paper bag or mesh bag | $0.10 - $0.25 |
A few notes on specific categories:
Make sure you calculate your real cost per item with packaging included. A $0.75 box on a $5 item is 15 percent of your price. That matters for your margins.
Deliver within two hours of packing. That is the rule that makes everything else easier. The shorter the window between your kitchen and the customer's door, the less you need to worry about temperature, freshness, and quality.
Here is how to keep different products in good shape during a delivery run:
For cold items (cheesecakes, cream-filled pastries, items with dairy):
For warm items (fresh bread, savory baked goods, soups):
For room-temperature items (cookies, brownies, granola, jams):
What not to do:
A good delivery route delivers warm and fragile items first, room-temperature items in the middle, and shelf-stable items last. Plan your route around your products, not just geography.
Fragile items are the number one source of delivery complaints for cottage food vendors. A box of perfectly decorated cookies can turn into a box of crumbled mess in one hard brake.
Here is how to package fragile items so they survive the trip:
Stacking rules for multi-item orders:
For decorated cakes specifically:
One broken cake costs you more than a case of proper cake boxes. The replacement ingredients, your time to rebake, and the customer's lost trust add up fast.
Professional-looking packaging does not require a professional budget. Most cottage food vendors spend $0.50 to $2.00 per order on packaging, and that is enough to make a great impression.
Suppliers like Good Start Packaging offer eco-friendly bakery packaging in bulk with volume discounts. Here is a budget-friendly packaging supply list:
| Supply | Where to Buy | Approx. Cost |
|---|---|---|
| Kraft bakery boxes (25-pack) | Amazon, WebstaurantStore | $12 - $18 ($0.50 - $0.72 each) |
| Tissue paper (100 sheets) | Dollar store, Amazon | $5 - $8 ($0.05 - $0.08 each) |
| Custom stickers with your name/logo (100 ct) | Sticker Mule, Avery, Canva + home printer | $15 - $30 ($0.15 - $0.30 each) |
| Bakery bags with window (100 ct) | Amazon, restaurant supply stores | $10 - $15 ($0.10 - $0.15 each) |
| Non-slip shelf liner (1 roll) | Dollar store, hardware store | $3 - $5 (lasts months) |
| Bubble wrap (small roll) | Dollar store, shipping supply stores | $5 - $8 (lasts months) |
| Insulated delivery bag (reusable) | Amazon, restaurant supply | $8 - $15 (reuse hundreds of times) |
| Labels (blank, for handwriting) | Office supply store, dollar store | $3 - $5 (lasts months) |
Tips for looking professional on a budget:
When you calculate your real cost per item, include packaging as a line item. If a box, sticker, and tissue paper add $0.80 to a $6 item, that is 13 percent of your price. You need to know that number when you set your prices.
Build packaging costs into your delivery fee or your product price. Do not eat the cost and hope it does not matter. It adds up. If you need help figuring out what to charge, this guide on how to price delivery fees walks through the math.
Every cottage food product you sell needs a label that meets your state's requirements. This is not optional, and it applies whether you sell at a farmers market, through a Homegrown storefront, or via delivery.
Most states require these elements on your cottage food label:
Build labeling into your packaging workflow so it is never an afterthought. Here is a simple process:
Delivery adds one extra labeling step that market sales do not: you also need to mark each package with the customer's name and order number. This prevents mix-ups when you are loading your car and making multiple stops.
A simple system is to write the customer's first name and delivery order on a sticky note or directly on the box top. When you are carrying three orders to your car, you need to know at a glance which box goes where.
If you take orders through a storefront like Homegrown, each order comes with the customer name and items listed in one place — so you can print or pull up your order list while you pack instead of scrolling through a week of text messages.
Loading your car well is just as important as packaging the food. A perfectly packed box can still get destroyed if it slides across your back seat during a turn.
Here is how to load your car for a delivery route:
Delivery order strategy:
If you have not set up your delivery zones yet, this guide on how to set delivery zones will help you plan routes that make sense for your schedule and your products.
A well-loaded car turns a stressful delivery run into a smooth 45-minute loop. It takes an extra 5 minutes to load carefully, and it saves you from arriving at a customer's door with a disaster.
Most cottage food vendors spend between $0.50 and $2.00 per order on packaging materials. That includes a box or bag, tissue paper or liner, a label, and a sticker. Buy supplies in bulk to keep costs at the lower end of that range. Build this cost into your product price or delivery fee so it does not eat into your margins.
You can reuse insulated bags, coolers, and sheet pans that you use to transport orders in your car. But the packaging that the customer receives should always be new. Used boxes, wrinkled bags, or recycled containers look unprofessional and can raise food safety concerns. The customer-facing packaging is part of your brand.
Kraft bakery boxes with tissue paper lining are the best all-around option for baked goods. They cost $0.50 to $1.50 each, protect against crushing, look clean and professional, and work for cookies, brownies, muffins, bread, and most other baked items. Add a branded sticker to close the box and you have a package that looks intentional without spending more than a dollar.
Yes. Jars are heavy and can break or leak if they shift during transport. Wrap each jar in a strip of bubble wrap or a cardboard sleeve, and place jars in a box with cardboard dividers so they cannot clink together. This setup costs about $0.75 to $1.50 per jar and prevents the kind of breakage that results in a lost sale, a mess in your car, and a refund.
Wrap hot food in foil first, then place it in an insulated bag. Never seal hot or warm food in airtight plastic containers because the trapped steam will make everything soggy. Deliver hot items first on your route so they spend the least time in transit. This approach keeps bread crusty, pastries flaky, and savory items at a safe serving temperature.
Most states require your name or business name, home address, a full ingredient list, allergen declarations, net weight, and a "Made in a Home Kitchen" disclaimer on every cottage food product. Check your state's specific cottage food law for the exact requirements. For delivery, also add the customer's name and order number to each package so you do not mix up orders during your route.
Package food as close to delivery time as possible, ideally within two hours. Baked goods hold up well for a few hours in a sealed box at room temperature, but anything with frosting, cream, or dairy should stay refrigerated until you are ready to load your car. Jams and shelf-stable preserves can be packaged a day or more in advance since they are not time-sensitive.
Good food packaging for local delivery does not have to be complicated or expensive. A few kraft boxes, some tissue paper, a roll of shelf liner, and an insulated bag will handle 90 percent of what you need.
The real key is building a repeatable system. Package the same way every time, label every order, load your car with a plan, and deliver within two hours. Your customers will notice the consistency, and that consistency is what turns a one-time buyer into a regular.
Packaging solves the physical side of delivery. The operational side — knowing what to pack and for whom — depends on how orders come in. If you are pulling order details from a week of text threads while packing 10 boxes, you will mislabel something.
Homegrown is $10/month with no percentage fees. Customers order and pay through your page, and you see one list with every name, every item, and every address before you start packing. No cross-referencing Venmo against Instagram DMs to figure out who ordered the jam and who ordered the cookies. Homegrown will not help you pick the right box size or plan your loading order — that is your kraft boxes and your car. But for the order list you tape to your kitchen counter while you pack, it replaces the text thread scroll.